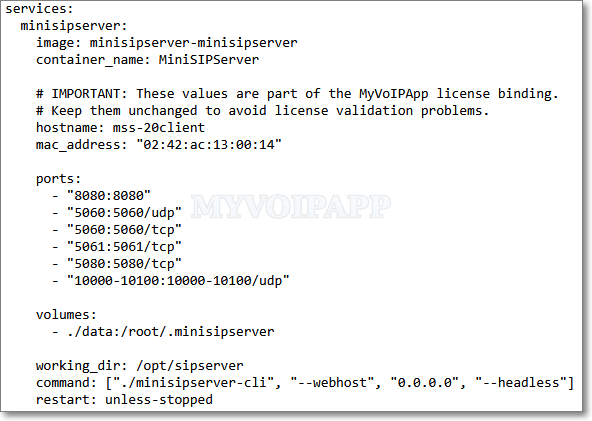
Please pay attention to the items hostname and mac_address. You can set these items with values you want, but they must be fixed since miniSIPServer will use them to bind the license key.
We have recently released a small piece of software: miniDNServer (abbreviated as MDNS), which mainly addresses two needs related to domain name resolution:
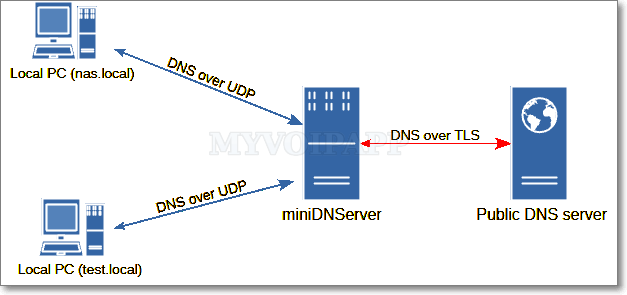
(1) We want to provide domain name access for various computing devices on the internal network, thereby enhancing the flexibility of network deployment. For example, a company’s internal NAS server can be set up to be accessed via the domain name “nas.local“. MDNS provides DNS services for various devices on the internal network through “DNS over UDP (DoU)”.
(2) Considering the hostile nature of the public network environment, we want to be able to access public DNS servers using encrypted methods when accessing external domains, avoiding various interferences with DNS results. In other words, MDNS can forward DNS requests from internal devices for external domains and use “DNS over TLS (DoT)” to access public DoT servers for domain name resolution.
The following diagram describes the network topology of MDNS’s working mode:
MDNS has been used in our own environment for some time, with good results, and we are very satisfied with it. When you are deploying a network environment for small to medium-sized enterprises, you may also consider trying this easy-to-use DNS software.
Let’s Encrypt certificates use the PEM format by default, so they can definitely be used to enable SIP-over-TLS.
We only need to link the Let’s Encrypt certificate file as ‘server.crt’ and the Let’s Encrypt key file as ‘server.key’. For example, the certificate and key signed by Let’s Encrypt for ‘demo.com’ are the following files:
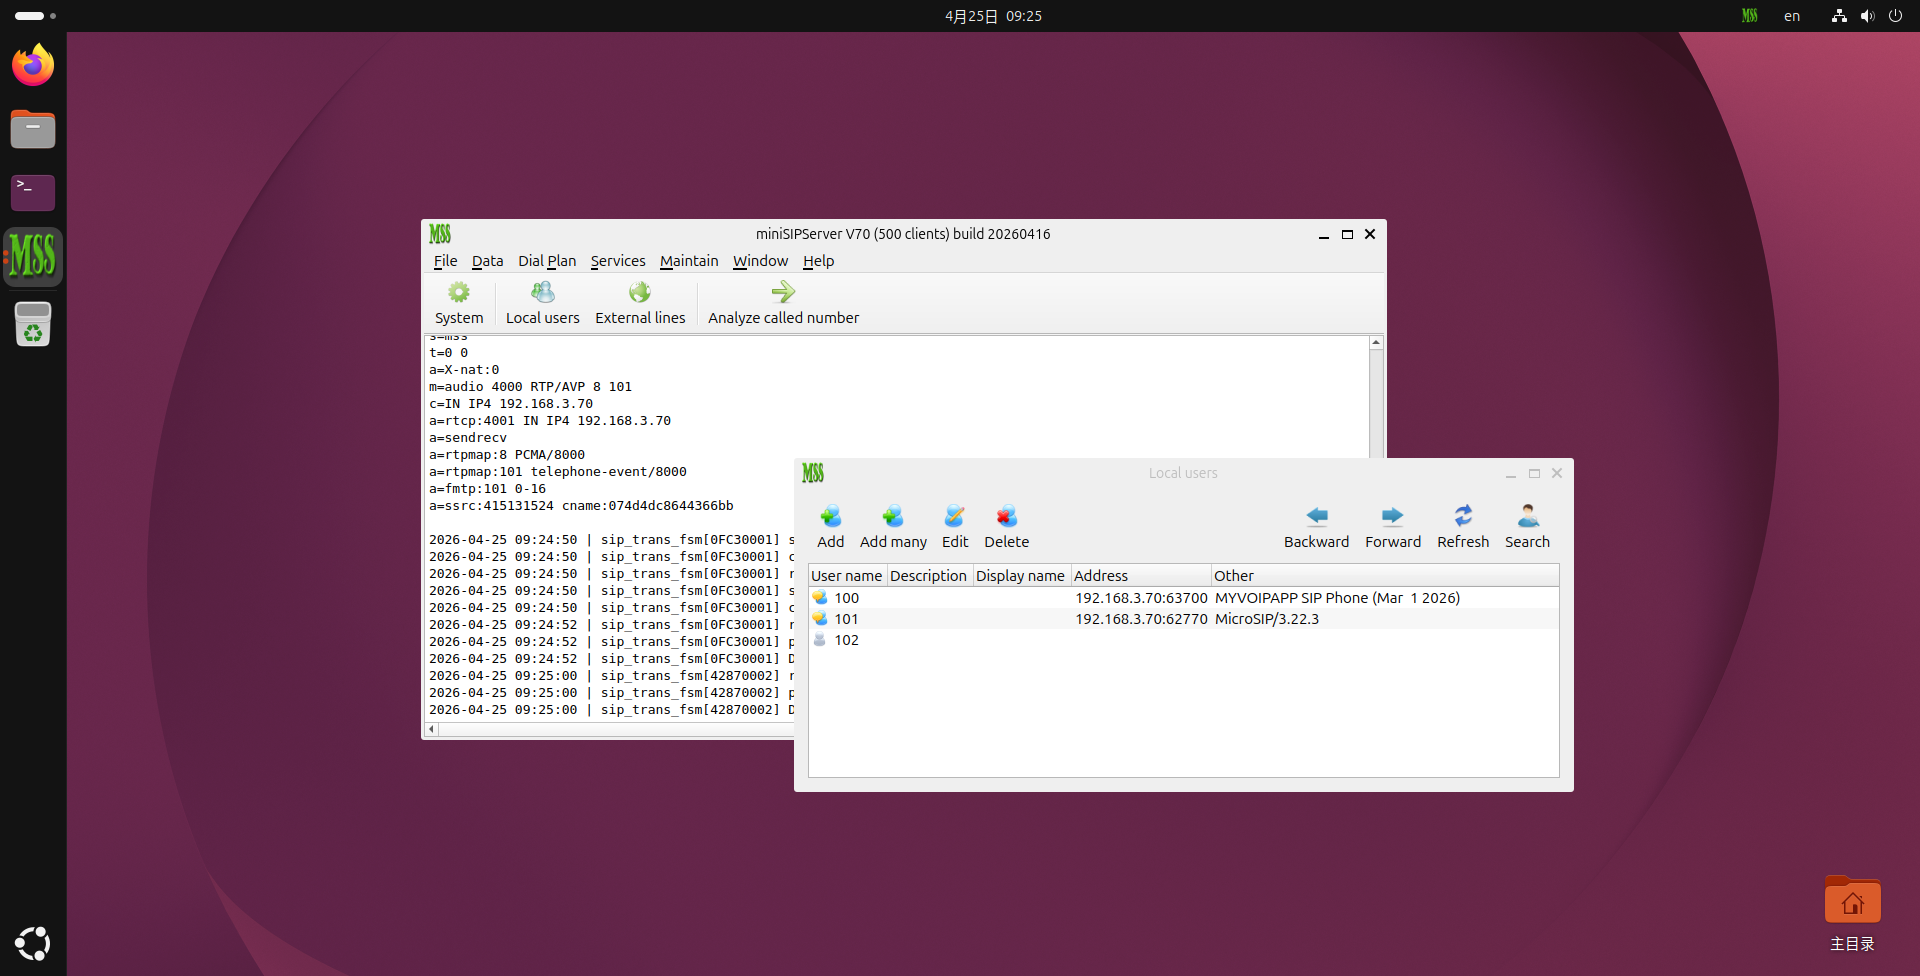
Ubuntu 26.04 has been released as the latest LTS version and is undoubtedly a major milestone release. We installed the system immediately and conducted a series of basic tests by running miniSIPServer. The test results are excellent. The program running interface is shown below:
Run miniSIPServer on Ubuntu 26.04
For deploying a new VoIP system, Ubuntu 26.04 is an excellent choice. However, if you plan to upgrade your existing system, it is recommended to hold off for a while. As a major release, Ubuntu 26.04 brings substantial changes compared with earlier versions. It is advisable to conduct comprehensive testing before deciding on an upgrade.
The new version of miniSIPServer allows users to make calls from browsers that support WebRTC, such as Chrome, Firefox and Edge. The slight inconvenience is that users must deploy their own TLS/SSL certificates to enable miniSIPServer to launch the WebSocket secure service and receive calls from browsers.
We have recently ported this feature to the cloud-based virtual miniSIPServer. More conveniently, users do not need to worry about certificates, as we automatically deploy TLS/SSL certificates for the virtual miniSIPServer. Users can simply initiate calls directly from their browsers. For example, a URL similar to the following can be used in a browser to place a call to your own cloud-based miniSIPServer:
The server parameter specifies the address of the virtual miniSIPServer. Currently, only virtual servers with the suffix s2.minisipserver.com are supported. If your server uses the old suffix s1.minisipserver.com, you must migrate to a new server to enable WebRTC calling.
For the other parameters: clr, pwd and cld, please refer to the previous documentation. The parameters are identical for both the local miniSIPServer and the cloud‑hosted virtual miniSIPServer.
Likewise, the virtual miniSIPServer currently only accepts incoming calls from WebRTC, and does not support initiating calls from the SIP domain to browsers or WebRTC clients.
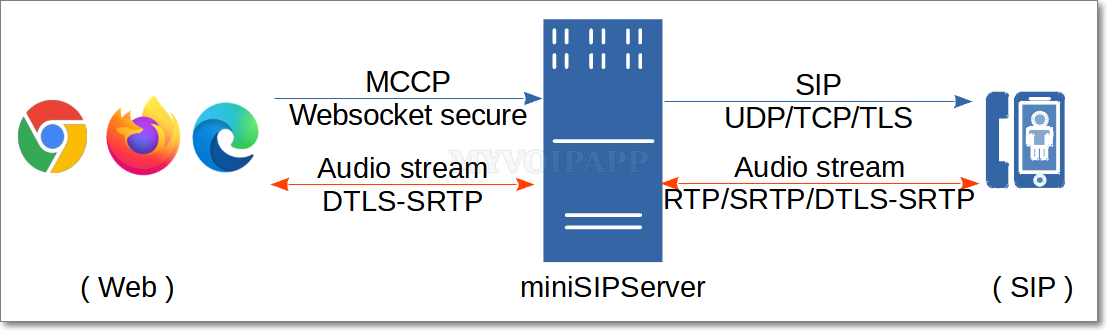
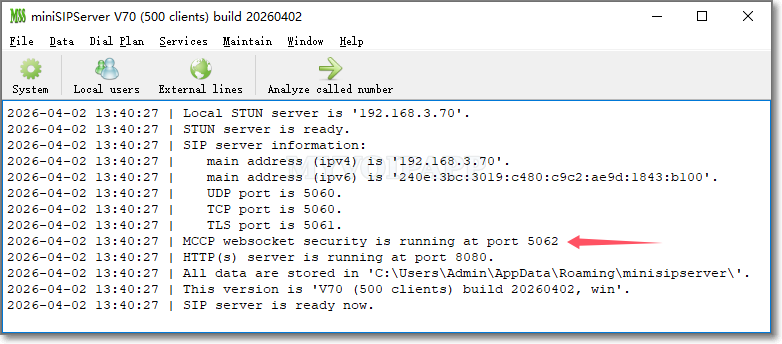
The newly released miniSIPServer (V70 build 20250402) supports an interesting feature: you can use a WebRTC-compatible browser (such as Chrome, Firefox, etc.) to make calls through miniSIPServer to devices within the SIP domain, including IP phones, gateways and other endpoints. The network topology is shown in the figure below:
The audio stream is transmitted via DTLS-SRTP with end-to-end encryption and interconnected with miniSIPServer. Currently, only voice calls are supported; video calls are not available.
The web side adopts a simplified signaling protocol (MCCP, miniSIPServer Call Control Protocol) for call control, and interconnects with miniSIPServer via encrypted WebSocket connections (WSS, WebSocket Secure). Currently, only calls initiated from the Web domain to the SIP domain are supported; reverse calls from the SIP domain to the Web domain are not available.
Simply enter the following URL in the browser to initiate a call to the SIP domain (for example, extension 100 calling extension 101):
The URL adopts a command-line-like format, with each parameter explained as follows:
https://www.myvoipapp.com/miniwebphone2/lite.html is a simple webpage. After being loaded in a browser, it can establish a WSS connection with the specified miniSIPServer server and initiate calls. You may download this webpage along with its related resources to your local device or a local web server; calls can also be initiated normally by opening the local file in a browser.
serverspecifies the address of the miniSIPServer. The miniSIPServer must have successfully loaded the certificate and private key, and enabled the WSS service. By default, miniSIPServer always runs the WSS service on TCP port 5062.
clrspecifies the caller number for initiating a call. This number must be a valid extension number assigned on miniSIPServer.
pwdstands for the authentication password of the caller, which is the password configured for the corresponding extension in miniSIPServer. miniSIPServer authenticates calls by verifying the combination of caller number and password. Only authenticated calls are allowed to connect; otherwise, the call will be rejected directly by miniSIPServer.
cldindicates the called number, which can be a local extension number or an outbound dialing number.
The audio stream is transmitted over DTLS-SRTP with end-to-end negotiation and encryption, requiring no additional configuration on miniSIPServer.
To enable the WSS service and accept MCCP call messages from browsers, miniSIPServer only requires configuration of certificate and private key.
miniSIPServer has the following requirements: (1) Certificates and private keys must be stored in the wrtcCert subdirectory under the application data directory; (2) Files must be in PEM format; (3) The certificate must be named server.crt and the private key must be named server.key. For example, on Linux systems, these two files should be located as follows:
In the field of SIP communication, there are two types of keep-alive mechanisms: device-level keep-alive and session (dialog) keep-alive.
Device-level keep-alive currently has mature and unified solutions that comply with RFC 3261, namely detection using the OPTIONS method. If the peer device returns a 200 OK response, the device is considered alive. Terminals can also detect device-level keep-alive using REGISTER requests.
Manufacturers have never had a unified solution for session keep-alive. Although RFC 4028 defines reINVITE and UPDATE for session keep-alive detection, these two operations are too complex for such purpose. They can trigger media renegotiation, which impairs call quality.
At present, manufacturers share basically the same idea: since normal reINVITE and UPDATE operations will trigger new media negotiation, can we use them without SDP directly for session keep-alive? reINVITE is an exception: reINVITE without SDP has already been used in the 3PCC procedure, so it can no longer be used for session keep-alive.
Based on our experience in interconnecting with equipment from various manufacturers over the years, we summarize the following operations for session keep-alive:
UPDATE without SDP
INFO without SDP
MESSAGE without SDP
Default behavior of the latest version of miniSIPServer:
If the above three types of SIP messages are received during a session, the server will enter the session keep-alive processing flow. If the session exists, a 200 OK response will be returned.
UPDATE and INFO can only be transmitted within a session by nature, so they inherently meet the requirements of keep-alive. We recommend using INFO first, as it is explicitly defined in RFC3261 and will definitely be supported by all manufacturers’ equipment. In contrast, the UPDATE method is defined in a supplementary specification. Some manufacturers’ equipment may not support UPDATE, let alone UPDATE without SDP.
MESSAGE can be transmitted both within a session and outside a session, and is used to deliver instant messages. We restrict MESSAGE without SDP to be transmitted only within a session and reserve it for the session keep-alive process.
The latest version of miniSIPPhone V26.1 has been released recently, which primarily includes the following key features or modifications:
1. support DTLS-SRTP
After miniSIPServer added support for DTLS-SRTP, we updated miniSIPPhone to enable encrypted voice stream transmission via DTLS-SRTP. When deploying enterprise communication networks, especially those involving external public cloud systems, we fully implement high-strength encryption for both signaling and media to ensure the security of enterprise communications.
In both miniSIPServer and miniSIPPhone, we have uniformly implemented the following restrictions for DTLS-SRTP:
(1) DTLS must be DTLSv1.2 or above.
(2) The encryption suite is fixed to SRTP_AES128_CM_SHA1_80. Although the specification defines several encryption suites, we use the highest-strength encryption and do not support negotiating other encryption suites.
(3) The fingerprint always uses SHA-256 encoding and does not support SHA-1 or other encoding methods.
2. Simplify SIP account configuration
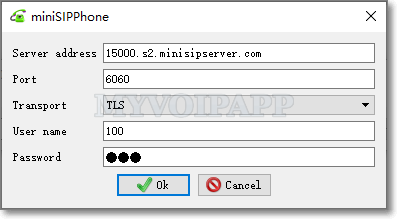
In the new version, when configuring SIP accounts, there is no longer a need for separate configuration to specify the port, as shown in the figure below:
Typically, SIP servers use standard ports to provide services, and users do not need to understand the port information specified by the protocol (just as we rarely specify or know about ports like 80 and 443 when accessing the internet). Therefore, we have removed the “Server Port” configuration option.
However, there are cases where SIP servers use non-standard ports (for example, miniSIPServer Cloud uses port 6060 for SIP-TLS access instead of the standard 5061 port). In the new version, we can specify both the address and port information together in the “Server Address” field, for example:
15000.s2.minisipserver.com:6060
If the server provides an IPv6 address and a non-standard port, we can configure it using the following example method:
In previous versions of miniSIPServer, in order to enable “SIP over TLS”, it was necessary to configure certificate and key files (including self-signed certificates and keys). If these files were not present in the configuration directory, miniSIPServer would not enable SIP over TLS by default.
Most customers deploy “SIP over TLS” using self-signed certificates and keys. Linux systems come with the openssl tool built-in, making it very easy and convenient to create these files. However, Windows systems do not have the openssl tool by default, requiring customers to download the tool to create certificates and keys, which is slightly more troublesome.
To reduce the workload for our customers, we have streamlined the steps for enabling “SIP over TLS” in miniSIPServer:
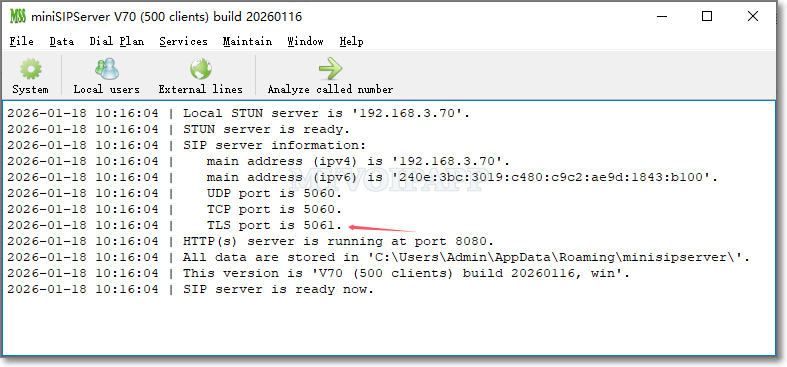
miniSIPServer now enables “SIP over TLS” by default. If certificate and key files are configured, it uses the customer’s provided certificates and keys to encrypt SIP messages. If no certificate or key files are configured, miniSIPServer automatically creates a self-signed certificate and key to encrypt SIP.
Therefore, when miniSIPServer starts, we can see the TLS port information, indicating that “SIP over TLS” has been enabled.
We typically develop and release the miniSIPServer software for Linux systems exclusively on Debian and Ubuntu, with versions distributed as deb installation packages by default. For users in the other major Linux ecosystem—the RPM camp—deploying miniSIPServer can be quite inconvenient.
Considering our limited resources (including manpower, equipment, etc.), we have decided to release the installation package in AppImage format, which is compatible with almost all non-Debian-based Linux systems.
It is very simple to use and does not even require installation. Save the downloaded miniSIPServer software (for example, minisipserver_gui_u500_x86_64.AppImage) in any directory, and then set the “executable permission”:
chmod +x minisipserver_gui_u500_x86_64.AppImage
Double-click the file or directly run it from the command line:
./minisipserver_gui_u500_x86_64.AppImage
Everything else is the same as with the deb package installation method. Configuration files are also stored in the $HOME/.minisipserver directory.
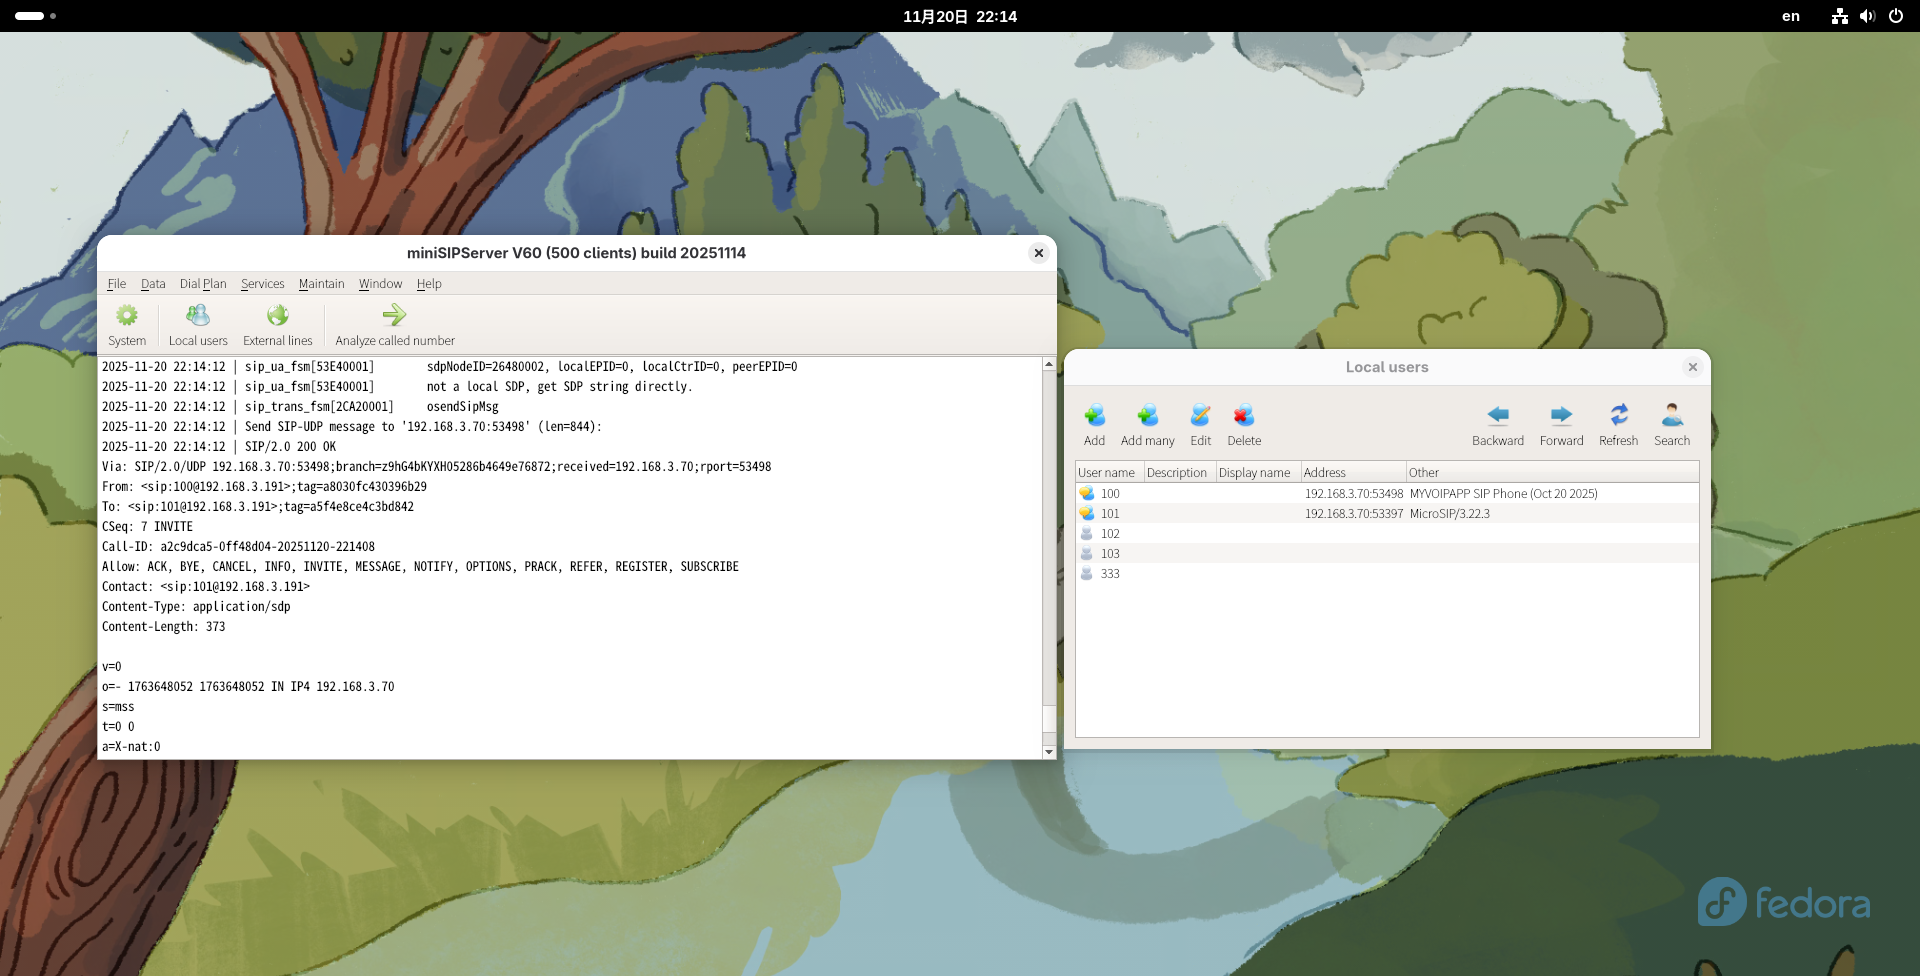
We tested on openSUSE (Leap 16), Fedora 42, and openEuler (24.03 LTS SP2) respectively, with satisfactory results:
Run miniSIPServer on openSUSERun miniSIPServer on FedoraRun miniSIPServer on openEuler