SIP trunk between MSSes
1. Description
Some customers have several office branches and hope to establish VoIP connections between them. There are several methods to do that. Here we give an example to describe how to establish voip connections between two MSSes with SIP trunk feature.
2. Network topology
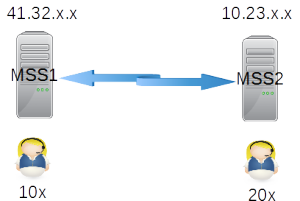
The network topology is simple. There are two office branches. Please refer to below figure.

Before we setup voip network, it is better to assign extension numbers. Different office numbers will effect how to configure call routing in both MSSes. In above figure, we can see the extensions in office 1 are 1xx, and extension numbers in office 2 are 2xx.
Both MSSes are configured with public IP address. If your MSS is behind NAT or router and you want to provide connection for outsides users, please refer to another document firstly.
Now we give detail configurations for it.
3. Configuration
In below configurations, items should be kept their default values if we don’t configure them obviously.
3.1 MSS1
Please click menu “data – SIP trunk”, then add a record:
SIP trunk ID = 1
Description = to MSS2
Server address = 10.23.x.x
Please click menu “dial plan – analyzed called number” , then add a record for routing 2xx to such SIP trunk.
called number prefix = 2
route type = SIP trunk
SIP trunk ID = 1
3.2 MSS2
It is almost same with MSS1.
Please click menu “data – SIP trunk” to add a record.
SIP trunk ID = 1
Description = to MSS1
Server address = 41.32.x.x
Please click menu “dial plan – analyzed called number” for routing calls to above SIP trunk.
called number prefix = 1
route type = SIP trunk
SIP trunk ID = 1