Simple-OEM plan
We have canceled this plan. Thanks.
We have canceled this plan. Thanks.
2018-04-30 updated:
With the latest V32, miniSIPServer will not support this feature. Please try to run miniSIPServer in windows auto-start methods.
If you have tried miniSipServer on Windows platform, you can find it is so easy to configure or manage a IP-PBX because miniSipServer provides a perfect GUI interface.
You can find it is very easy to do that on Ubuntu/Linux because miniSipServer can support GUI interface on Ubuntu/Linux now! WINE is unnecessary now!
Please visit our download page to download miniSipServer .deb packages according to your requirements:
http://www.myvoipapp.com/download
After you download .deb file from our website, please click (or double-click) it to install MSS. No more actions! So easy, so funny.
After you finish your install, you will find miniSipServer at “Applications / Internet” group.
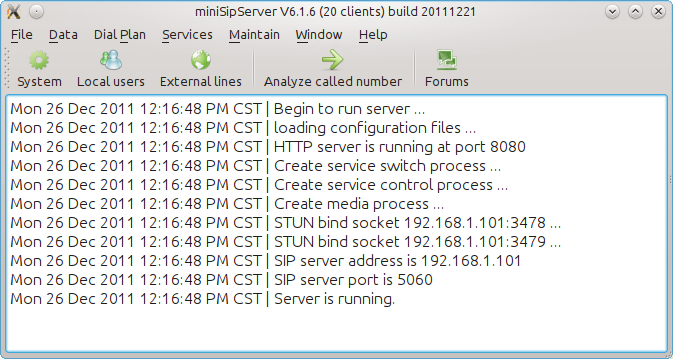
Following figure is a screenshot of MSS running on Kubuntu:

In another way, if you just want to run a command line sip server, you can also go to directory “/opt/sipserver” and find “msscli” which is a command-line miniSipServer and has the same core with GUI-miniSipServer. You can manage and configure it through web interface.
Sometimes, we need limit the call right of some extensions. For example, we want to limit only specific extensions can make out-group calls to outsides, others can only make calls between extensions.
In MSS, we use “call level” feature to do it. By default, we don’t assign “call level” to any called number prefix in “analyze called number” table. That means all extensions can have the same right. To limit extensions, we should indicatedifferent “call level” to the called number prefix and assign relative “call level” right to special extensions, then they will have the right to make such calls.
For example, the default out-group call prefix is “9”. Please click menu “Dial plan / Analyze called number” and edit or add a record whose prefix is “9” and route type is “external line”. In this configuration, we can select “call level 1” to this prefix “9”.
Then, please click menu “data / local users” and edit or add a local user. In the pop-up dialog, please click “Basic Call” tab and enable “Call level 1” to this extension.
After that, the extension has the “call level 1” right to make calls to outside by dialing “9xxxxx”. For others, since they don’t have “call level 1” right, their calls will be rejected when they dial “9xxxxx”.
Some customers often request to deploy MSS behind NAT, but still need provide public service. That means MSS is in private network and some SIP phones/clients are in public network (internet), or MSS need work with public VoIP carriers’ network.
Following figure describes a simple network for this scenario:

In this network, we can see
(1) Private network is connected to public network by a router whose public address is 8.8.8.8 and private address is 192.168.1.1
(2) MSS is deployed in private network with private address 192.168.1.2.
(3) Some SIP phones are in the same private network, such as local users 100 and 101. Some SIP phones are in public network, such as local user 102.
It is no problem for local user 100 and 101 to visit MSS since they are in the same network. So the problem is how to make outside local user (102) can visit MSS.
We can resolve it by forwarding some ports in router.
First, in the router, we can configure forwarding UDP port 5060, 10000~20000 to the PC where MSS is installed. Most routers can support this function. Port 5060 is standard SIP port. Ports 10000~20000 are RTP ports to transfer media streams.
Second, we must indicate MSS to work with public address. Please click menu “Data / System / SIP” and fill the “Main address” with the public address “8.8.8.8”. SIP phones/clients can use this public address to visit MSS.
There is another problem. In above scenario, the router is configured with a fixed public address. In normal, the router could be ADSL router and it maybe has a dynamic IP address. Outside users cannot use the dynamic address to visit MSS. Then, how can we provide public services?
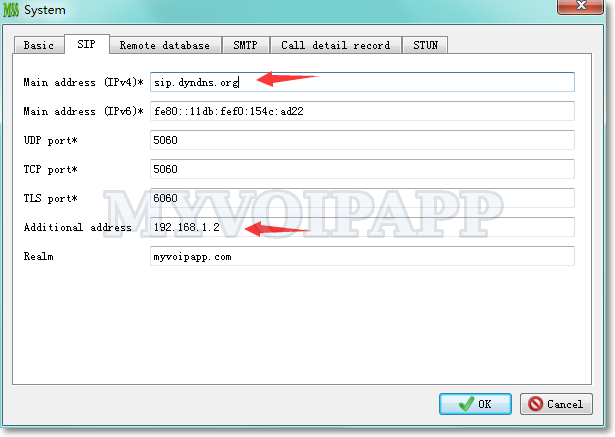
To resolve it, we can use domain name, for example, we can use DynDNS to provide domain name for our MSS. The router must be able to support “Dynamic DNS”. In our example, we assume we get a domain name “sip.dyndns.org” from DynDNS and configure it in our router, then we can use this domain name as another miniSIPServer address. In following figure, we use such domain name as main address, and use the private address as additional address.

SIP phones/clients must be able to use domain name as server address or proxy address, so they can configure “sip.dyndns.org” to visit MSS in our scenario and make calls.
Local miniSipServer (stable) is upgraded to V6.1.4.
In this version, trial duration is changed from 20 days to 30 days. Some customers need more time to test MSS full features. We think it is very reasonable, so V6.1.4 or higher can support more trial duration.
In another way, this version is updated to support “direction” parameter in PRESENCE NOTIFY message which is very necessary for call center applications. This parameter is used to indicate the operator current call is outgoing or incoming.
By default, incoming calls from external lines will be routed to local users or auto-attendants.
But in some deployment, customers require that incoming call from external lines should be routed to hunting-group. Then local users can answer the incoming calls in round-robin order.
It is very easy to do that in MSS. Do you remember that we need configure a called number to trigger hunting-group, right? In this table, you only need configure it with external line number.
For example, external line is “1234567”, then in the “hunting group detection” configuration, we only need configure detection called number to be “1234567” to trigger hunting-group.
Cloud-MSS is upgraded to support uploading customized audio file.
In auto-attendant or voice-mail features, customers often hope to use their own audio files. It is very easy to replace system audio files in local-MSS. But in cloud-MSS, it has little problem, such as file transferred through internet, etc.
With the new version, customers can upload audio file through HTTP. Of course, the audio file should have the same format same with local-MSS required.
After sign into your cloud-MSS account, please follow the steps described in below figure:
We need mention that please be paitent because cloud-MSS will try to download the audio file from your HTTP URL immediately. It could be slow if the network is not very good.
Gianfranco, one of our partners, released a new softphone SDK. This SDK provides full SIP features, such as HOLD, Transfer, and so on. It works as .net component or .com component. It is easy to build a new softphone base on this SDK.
Most important, it has been tested with lots of SIP servers or proxy, such as our SIP server (miniSipServer), Asterisk, OpenSER and so on.
If you are interesting in building your own SIP softphone, this SDK could be a very good choice for you.
The official website is http://www.lullabysdk.com/